Description
Materials
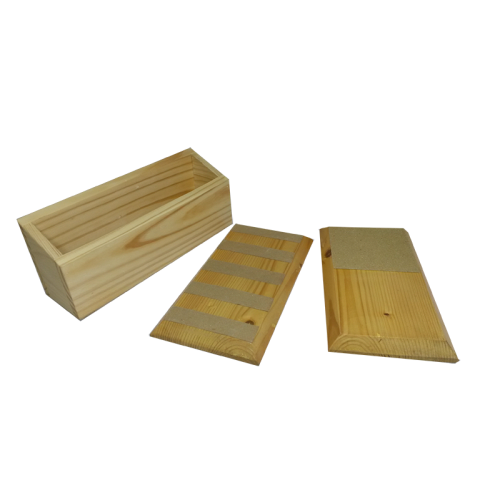
Three rectangular boards:
One divided into two halves: the first half is polished and the second half is covered in sandpaper.
One divided into ten strips: five strips are polished and five strips are covered in sandpaper as with the previous one.
One divided into five strips from very rough to nearly smooth, starting with the same grade of sandpaper that is used in the previous boards (the sandpaper then in gradations of roughness).
Invite the child by telling him you have something to show him. Tell him that before we can work with the material, we must always sensitize our fingertips. (See Sensitizing Fingertips) Bring him over to the correct shelf and show him the Rough and Smooth tablets. Name the tablets for the child and tell him that we will be working with them today. Show the child how to carry the one tablet being used and have him bring it over to the table. Have him place it in the center of the table. Then have the child sit to your left.
– Secure the board in place using your left hand, but make sure it is not blocking the child’s sight or touching one of the rough or smooth parts.
– Gently place your right hand at the top of the rough half and gently stroke the rough half from top to bottom.
– Remember to keep your hand relaxed.
– Repeat in the same manner for the smooth half.
– Repeat both sides.
– Invite the child to touch in the same manner as you have done.
– Once the child has felt the board, you feel the board in the same manner as before, this time saying “rough” when you are touching the rough part and say “smooth” when you are touching the smooth part.
– Secure the board in place using your left hand, but make sure it is not blocking the child’s sight or touching one of the rough or smooth parts.
– Gently place your right index and middle fingers at the top of the first strip (the strip furthest to the left).
– Gently trace the strip from top to bottom.
– Repeat for all of the other strips.
– Remember to keep your hand relaxed.
– You can also close your eyes to feel better.
– Invite the child to feel this board.
– Then you feel the board in the same manner as before, this time saying “rough” as you pass over the rough parts and say “smooth” when you are touching the smooth parts.
– Secure the board in place using your left hand, but make sure it is not blocking the child’s sight or touching one of the rough or smooth parts.
– Gently place your right index and middle fingers at the top of the first strip (the strip furthest to the left and the one closest to smooth).
– Gently trace the strip from top to bottom.
– Repeat for all of the other strips.
– Remember to keep your hand relaxed.
– You can also close your eyes to feel better.
– Invite the child to feel this board.
Rough and Smooth (boards 1 and 2)
Direct
To refine the tactile sense.
To acquire better muscular control through lightness of touch.
Indirect
Preparation for writing.
There is no control of error in the material but the strips of sandpaper guide the child’s hand.
3 – 3 1/2 years
(After sufficient experience with Practical Life and early Sensorial materials.)



Reviews
There are no reviews yet.